


Hey everyone,
I’m writing this to introduce everyone to a new keyboard project I’ve been working on that I’ve named “Cerberus”. It’s a FRL TKL that uses single-sided gasket mounting.

I have a bunch of details on the design itself below, but if you’re ready to just fill out an IC form, it’s available HERE. I need your feedback!
The inspiration for this board came from a desire to highlight a mounting style that ai03 used on the Brutal v2 series, but hasn’t shown up in many other places - and also to make a “sequel” board to the two-side gasket / sandwich mounted Chimera65.
The Mounting Style
The Cerberus keyboard and Brutal v2 both use a single-sided gasket mounting structure, where only the bottom case has gaskets. The goal of this structure is to better mimic the sound of top mount keyboards, while also adding some of the benefits of gaskets.
In top mount keyboards, the plate is screwed into the top part of the keyboard, making plate-to-top contact, and does not touch the bottom part of the keyboard. On Cerberus, this plate-to-top contact is present due to the gaskets only existing under the plate, and the top case being designed to touch the top plate.

And by virtue of having gaskets under the plate, there is some bounce present when typing on the board, more similar to a Bakeneko or other gasket mounted board. This provides acoustic isolation between the plate and bottom case - eliminating a confounding factor in trying to achieve that top mount style sound.
The end result is a board that sounds as good as and also feels less stiff than a traditional top mount board (though, in my opinion, plate material will make the most difference in terms of perceived stiffness).

With that in mind - there are still some key differences in the mounting style of Cerberus and the Brutal v2 series. Primarily, the Cerberus covers far less surface area with gaskets than the Brutal v2 did. This results in more bounce, as there are fewer contact points where gaskets need to compress. But I believe the resulting sound is more similar to top mount - on usual top mount boards, the plate to top contact zones are not that large.
The Theme
Since this board is meant to be a bit of a sequel to Chimera - I picked another mythological creature as its theme. I didn’t want to make another Chimera-style board - like a ChimeraTKL or a Chimera75 (though, if people want that, please let me know) - I wanted it to be something new.
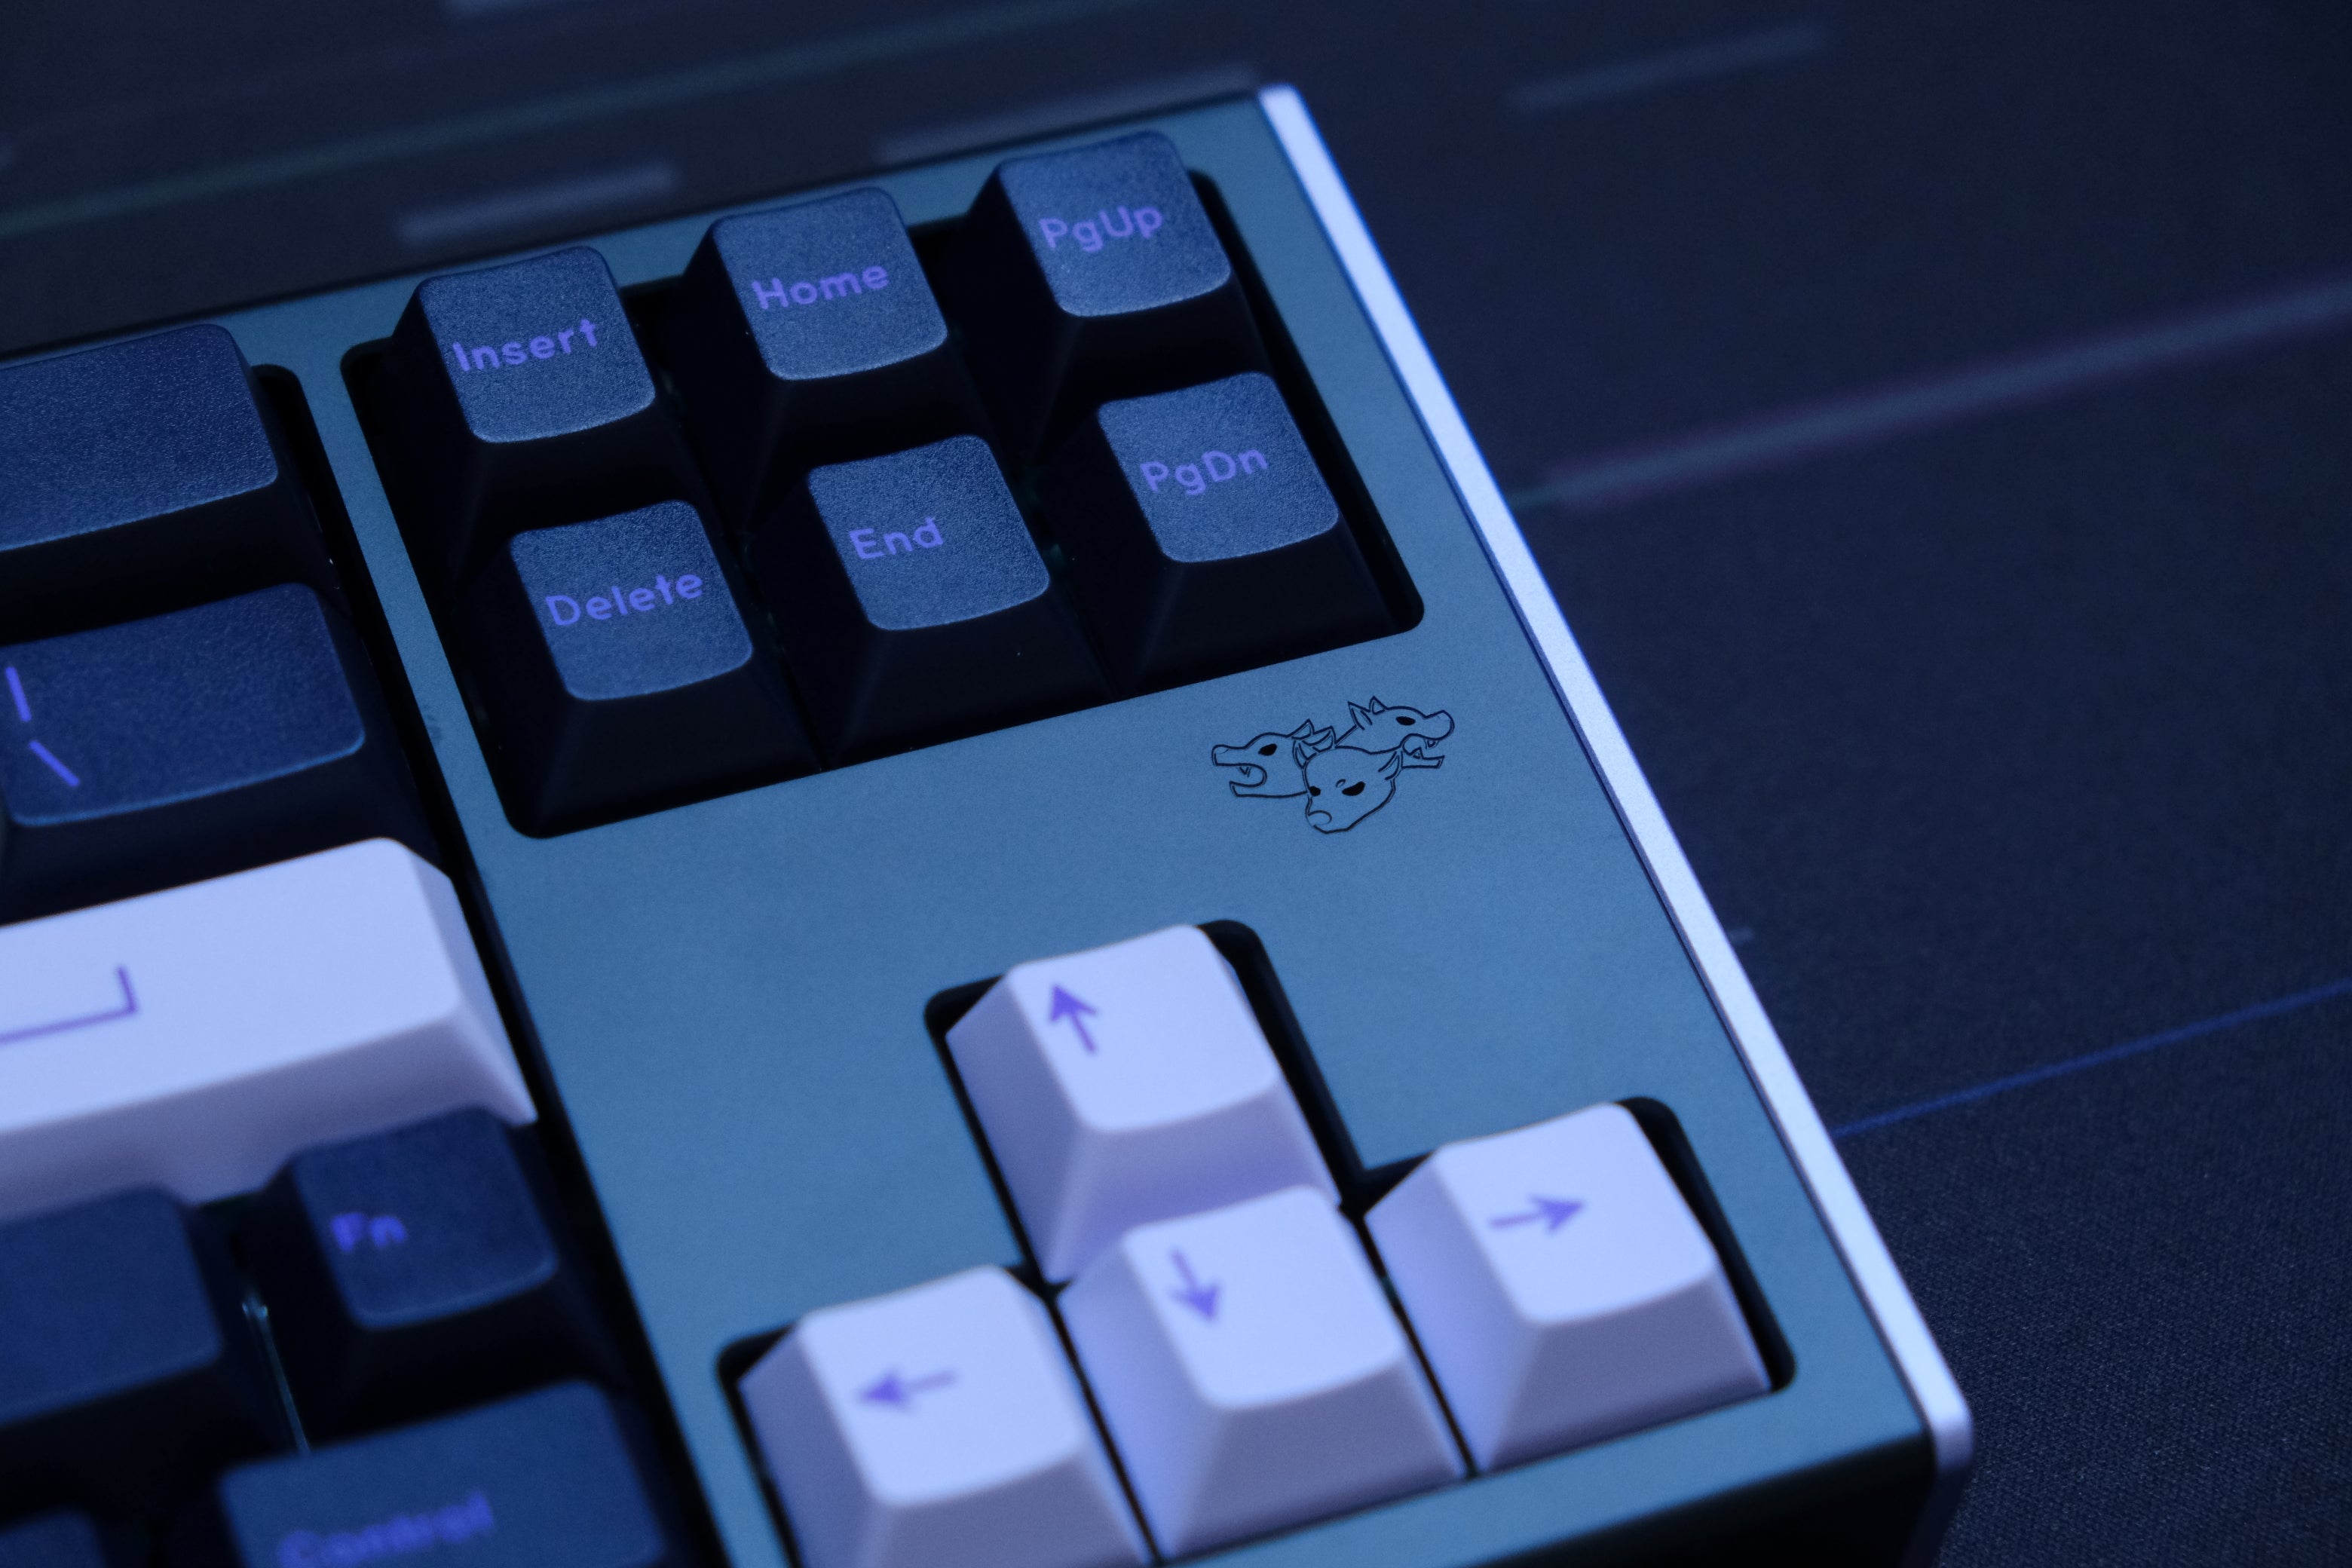
Cerberus is a three headed dog from Greek mythology who guarded the gates of Hades. So with the theme of Cerberus, I tried to design around the concept of three. Cerberus has three heads, so the board has three main accent pieces. There are two colored side pieces, and a bottom crest all sharing an accent color - for three accent pieces total. And when looking at the bottom of the board, there are three “weights” visible (two brass, one accent piece).

Finally, there’s an engraving of a Cerberus head on the top of the board above the arrow cluster. One piece of feedback I heard about Chimera is that people wished the engraving on the back of the board was mimicked on the front. So I tried to do that here. In addition, the eyes glow with RGB LEDs mounted behind them.

Other Design Considerations
The side profile of the board was designed to be aesthetically pleasing, while still giving users an easy way to pick up the board. One of my personal pet peeves is when a board is hard to pick up - and I try to avoid that in my designs. Many of my previous boards have featured Koala-like curves to enable this, but this time around, I went with a curved back.

For this board, I decided to include wireless functionality. It’s likely not going to be wireless by default, but I wanted to ensure that people who want a wireless board would have an option here for it. The interior of the case has a cavity to hold a battery, and when I tested a ZMK PCB that I designed for Cerberus with an FR4 plate, the wireless worked well. When using the wireless PCB, the RGB LEDs shining through the Cerberus’s eyes also double as status indicators - which I think is a neat little touch.

To reduce the acoustic impact of including this battery cavity, I also included an inner brass weight. This weight spans across the alphas on the board - which has been perceived by hobbyists in the past to improve the sound of the alphas as well. Personally, I do think it makes an impact which I consider an improvement, but if others prefer the sound without the inner weight, that’s totally valid as well.

I also wanted the Cerberus to sit low on a desk. It’s not the lowest keyboard ever designed, but the front of the keyboard is less than 18mm tall (as it sits on a desk), and the case is ~20mm tall at the middle of the first row of keys.The case has a 6.5 degree typing angle, to make it comfortable for most people.
As a result of the design decision to make the keyboard sit low - including three external weights was non-trivial. Parts of the bottom case are entirely cut out to ensure the weights have space to mount. But the acoustic impacts of these cutouts are mitigated by the inner brass weight covering.
There are 4 POM alignment pins included in each unit to help ensure the plate stays centered. The current mounting style does compress the bottom gaskets (which are quite soft) a little, but does not provide nearly enough compression to lock the plate in place. I also don’t use screws to keep the plate in place as you would if you were making a top mount board - so I chose to use alignment pins. I drew inspiration from the Moment keyboard designed by jjw - this was also a single-sided gasket mounted board, with the key difference being that the top case did not touch the plate.

Finally - I wanted to design this board to be price accessible. One of the key reasons why I chose to use an inner weight and three external weights instead of relying on a through weight was to keep costs down. This is a bit counterintuitive - how can more parts be cheaper than one part? But the external weight and inner weight can all be machined from flat stock. Through weights typically have angled features, requiring extra machine time which drives up the cost of keyboards. The inner weight also solved other design problems as well, making the choice even easier.
Based on these efforts, we should be able to sell Cerberus at an MSRP starting under $300.
The Small Details
To provide even compression across the gaskets, and also keep the back curve present on the board, I had to use “internal” screws. There are four screws on the bottom of the board that are necessary to keep the top and bottom case parts together - but there are also 6 screws under the keycaps. The screws that we’ll include for Cerberus will be black screws - at least for these 6 spots - so that the chances of noticing the screws under your keycaps in day to day use is minimized.

And about the four screws on the bottom of the board - we’ve created molded rubber feet to cover where they sit. If you look at the bottom of the board once fully assembled, you won’t see screw holes. I may modify these to round out the edges to make them less noticeable.

Hearing feedback on prior projects about the big Cannon logo being a polarizing feature - I’ve decided to move it to above the USB port for Cerberus. It’s much smaller than it was on a board like Chimera or Balance, and much easier to ignore now if you aren’t a huge fan of it.
The side accent pieces have a small chamfer where they meet the top and bottom cases - which also share this small chamfer. This little design element helps further provide separation between the accent pieces and the top and bottom cases. The top and bottom cases are designed to look seamless.
And the USB port is centered on the back of the board, and features a little hood. This should cover most of the metal bits on most USB cables, so your board will look sleek when used.
I’ve also added little cutouts for force-break specific gaskets.The idea behind force breaking is to break the metal on metal contact of the top case with the bottom case. In my testing, I used soft poron for force breaking, which did make a small change in acoustics. I believe the board already sounds good without force breaking - but this is an extra way that people can tune their boards to match their preference.

I used the same cutouts and gaskets to also provide force-breaking between the plate and top case. Personally, I preferred the acoustics of the board without these installed. Installing them removes the plate-to-top contact which helps the board mimic top-mount acoustics. But they are also there for those who want to experiment and tune their board, or simply prefer a more isolated sound.
The Evolution of the Design
What you’re seeing now is not how Cerberus was initially envisioned - and I wanted to share a bit of the design process and how I landed here. There are more similarities than differences between the two versions of prototypes that I had made, but I think it’s interesting to see the process.
The first prototype has a few notable differences:
- No alignment pins
- Almost completely different bottom weights
- Additional top badge with Cerberus engraving, but no RGB
Adding alignment pins was a bit of a no brainer. Initially, I had hoped the gaskets would compress enough that friction would lock the plate into place. This was not the case. Even when the keyboard was fully assembled, I could physically move the plate assembly left and right in the case when it was assembled. And if you shook the case, you could hear some rattling. But sound and feel wise - the first prototype checked all the boxes. I didn’t want to change the compression characteristics of the board and change the sound and feel, so alignment pins were the best solution.
For the bottom weights - the first prototype’s weights just felt a bit too… normal. The idea at first was to use a “medallion” instead of a “crest” like we did on Chimera. With the dimensions of the board, it felt like it would fit better. So I went along that path for the first prototype. But when I saw it, it just didn’t hit the right way for me. While more difficult to machine, the current badge feels way more detailed, and gives the board a bit more uniqueness in my opinion.

Because of thickness limitations, I couldn’t make the revised Cerberus accent piece any larger than it is on the second prototype. Instead, I had to adjust the two brass external weights to be slightly smaller. With these adjustments, keeping the flame engravings on the weights wouldn’t have provided the same sort of visual balance it once did - so I removed them. This makes me a bit sad, as I felt like those flames really added to the theme, but I do overall love the bottom of the keyboard a lot more now.

And for the top case - I made the decision to remove the mini Cerberus medallion, and change it into an engraving with glowing eyes. First - I think glowing eyes are really cool - and if you don’t, you can always turn them off. When first picking the theme of Cerberus, I wanted to add glowing eyes somewhere, but couldn’t figure out where. And with the medallion shape on the back removed, I didn’t think it made much sense to keep a medallion shape on the front. While the front is now missing a visual accent that used to be there, it’s a cleaner look now, and the engraving can be infilled to provide extra contrast. I also wanted to listen to feedback from Ripple about the badge - it was a bit of a polarizing feature, so simplifying to an engraving felt like the right call.
Future Improvements
There are still a few things I’d like changed in the final production design. At the moment, when the bottom of the keyboard meets the back curve, I think it changes too abruptly. I’m going to smooth out the transition there. It’s a small thing that some people might not notice, but as I’ve used the board in testing, it’s the one thing that stands out to me as out of place.

Another issue with the current prototype is the crest fitment. It looks like there is a gap on one side, but not the other. There’s supposed to be a miniscule, even gap around the crest. That isn’t the case, and I’ll be talking to the factory about solutions. As drawn in the 3d model - the gap is consistent - so I think this is likely a machining or tolerance problem. Either way, it’ll be addressed for production.

Both of the prototypes I got came with brass bottom accents. And while brass is cool and heavy, I think offering those in aluminum for more of a color selection, or copper, or stainless steel, or all three - would be pretty cool, and work better, aesthetically, for some colors. It would make the board weight less - but that could be a good thing for some people.
With all that in mind, overall - I’m pretty happy with the current design, which is why I’ve chosen to IC it now!
TL;DR
- Cerberus is an FRL TKL with single-sided gasket mounting.
- Gaskets sit between the plate and bottom case
- The plate touches the top case to provide acoustics similar to a top mount keyboard.
- It feels good to type on and sounds good
- It looks cool
- The eyes on the top Cerberus engraving glow with RGB lights
- Super cool Cerberus shaped crest on the bottom
- 8 part case not including the plate
- Designed to support wireless (as an addon)
- Sub $300 MSRP
PCB Details
- QMK and VIA compatible PCB (wired) w/ STM32 Microcontroller
- Both hotswap and solderable will be available
- ZMK compatible PCB (wireless) w/ nrf52 Microcontroller (ZMK Studio soon)
- Only hotswap for wireless
- Hotswap PCBs will have 7U bottom row support only, probably, fill out the IC if you think that’s bad
- S1 Unified Daughterboard (it will use Molex Pico EzMate)
- All PCBs will feature ESD protection
- No Backlight Support
- RGB Daughterboard for glowing eyes
Other Things People Normally Ask About
- Weight: 1518g built with PC Plate, Bottom Brass Weights
- Front height: ~17.75mm
- Front height in the middle of the bottom row: ~20mm
- Angle: 6.5 Degrees
Checking Interest
There are a few things that I’m still trying to figure out about this board, and it’s also not too late to make some changes.I’ve tried to incorporate feedback from prior designs already to create something that I’ll like, but that lots of other people will also like. So I’d love your feedback! I can’t promise that certain things will change, but all feedback is welcome.
Currently, I don’t know what colors to offer. We’ve received prototypes in Black and Red and Purple and Grey. Both of them look pretty cool, but I’m not sure that I’m sold on the shade of red. I want to offer an “ectoplasmic green” accent color similar to Thresh from League of Legends - if you’re familiar with that - because I think it’ll fit the Cerberus theme pretty well.
Whatever colors I do land on - I’m thinking about offering set colorways similar to how I’ve done Chimera in the past. But I’m open to suggestions - so submit your favorite colorway to the IC form. Would people rather be able to mix and match from whatever colors are available? If enough people ask - I’ll try my best to make sure that happens.
Then there’s layouts - I’m planning on selling this by default with a fixed 7U bottom row hotswap PCB, so that WKL is also supported. I think It’d be silly to run an FRL TKL and not offer WKL, so I’ll offer WKL during the group buy for sure!
Do people want 6.25u bottom row support on the plate? What about the hotswap PCB? Are there passionate 6.25U bottom row supporters for TKL sized boards? I’d love to hear from you and find out!
For plate materials, I’ve tested PC, Alu, and FR4. They all sound good, my favorite is FR4 (surprise, surprise). What other plate materials would you like to see?
Our sub $300 MSRP is based on a 200 MOQ. Is that realistic? The price might go up a bit if we can’t hit our target MOQ. And selling 200 custom keyboards (that aren’t from GEON lol) is a lot in 2024. If you’re interested in the board at the ~$300 price point, please let us know in the IC form as well!
Are you interested in the wireless option for the board? Are there enough people for us to offer a hotswap ISO PCB? Or do you have any other comments, questions or concerns? That’s exactly what the IC form is for - so don’t be afraid to submit!
>> SUBMIT THE IC FORM HERE <<
Thanks!
More Photos


